1. Go to the left side of the screen
and select "DRAG BALANCE."
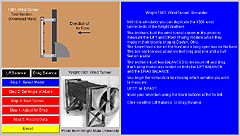
In the simulation, you are looking down on the apparatus.
2. Next, click "Step
1: Select Model." The models are wing sections.
Some are flat and some are curved. For the first experiment,
select a flat plate (Model 1).
3. Next, click "Step
3: Start Tunnel." The air will begin flowing
around the plate.
4. If you observe the Drag
Balance (a meter varying from -20 to +25 degrees)
at the bottom center of the screen, you will see that
the ratio of drag to lift is 0.00. There will be some
small drag present. But since there is no lift, the
Drag/Lift Ratio is not defined.
5. Now, click "Step
2: Set Angle of Attack." Move the cursor
onto Wilbur's arm. Hold down the left mouse button and
move the cursor up or down to adjust the angle of attach.
For this experiment, adjust the angle of attack to 3
degrees.
6. Click again on "Step
3: Start Tunnel."
7. Observe the Drag
Balance again. The Drag/Lift Ratio = 0.089 -
0.096, which means that the drag on the flat plate is
now 8.9% - 9.6% of the lift.
8. Increase the Angle
of Attack. What happens to the Drag/Lift Ratio?
9. Try other shapes. Follow the suggestions
on the simulator page to experience how Wilbur and Orville
systematically developed successful wing designs. (Try
bi-wing and tri-wing designs!)
|


 To
experiment with drag, try the Interactive Wright 1901 Wind
Tunnel simulation and follow the instructions below:
To
experiment with drag, try the Interactive Wright 1901 Wind
Tunnel simulation and follow the instructions below: