
This section describes the use of GMAN through its graphical user interface. The command line mode, which is useful on terminals without graphics capabilities, is described starting in the section Command Line Interface Mode.
GMAN's general screen layout is shown below. The material in the various areas of the screen will change, depending on the operation being performed, but the general screen layout will remain the same.
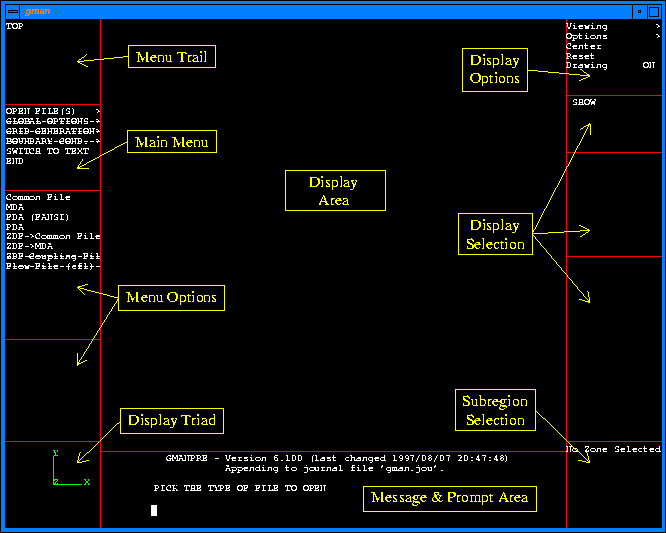
The various areas of the screen, and their function are:
| Display Area | Used to display the computational grid and/or boundary conditions. | ||
|---|---|---|---|
| Message and Prompt Area | Used to display GMAN messages and prompts, and for typing user input. | ||
| Menu Trail | History list of GMAN menus and sub-menus. | ||
| Main Menu | Current menu of GMAN operations to choose from. | ||
| Menu Options | Options for the currently selected GMAN menu. | ||
| Display Triad | Indicates the current orientation of the view in the Display Area. | ||
| Display Options | Menus and options affecting the viewpoint and appearance of the Display Area. | ||
| Display Selection | Menus and options relating to the elements of the grid to be shown in the Display Area, and/or written to a file. | ||
| Subregion Selection | Indicates the subregion selection within the current zone. |
Input to GMAN is generated by either typing commands and/or responses into the Message and Prompt Area, or by picking "items" from the screen. An "item" might be an operation from a menu, a menu or display option, or a point or boundary in the Display Area.
Picking items from the screen involves pointing to the item using either a cursor or crosshairs, depending on the terminal type. Crosshairs will appear as two intersecting lines, one vertical and the other horizontal. The cursor or crosshair is controlled using the arrow keys on the keyboard or with the use of a mouse. The "pick" takes place when the user depresses the space bar or pushes the appropriate mouse button. (On certain terminals the mouse button must be programmed as a "space").
Menu items can also be picked by typing in a character string with enough characters to uniquely identify the item. For this reason, very short file names may cause problems. For example, if the user tries to open a file named D or d, the code cannot distinguish between the file name and, say, the Drawing item in the Display Options.
When the code requires input of an index range for grid generation or some other function, the entire grid can be selected by entering ALL at the prompt. The maximum index values can be referred to using MAX in place of the actual integer. Grid indices should be entered as integers (or MAX), separated by commas.
When a menu or option item is picked, the action corresponding to that item takes place. When an item in the Display Area is picked, GMAN will use the item picked as a response to the current prompt, if appropriate, or else will display information relevant to that point (i.e., the computational indices, xyz coordinates, boundary conditions, etc.).
In the various menu and option areas of the screen, the entry ==MORE== at the top or bottom indicates that the list of choices is longer than the space available. Picking ==MORE== will scroll the list, allowing the remaining choices to be seen.
The > symbol to the right of a menu item indicates that when this item is picked, the program will request additional input, either through another menu or list of options, or by prompting for input in the Message and Prompt Area.
Some menu items are flagged with an * at the left to indicate that they are the default or currently selected item.
Any menu item that appears with a line through it is not currently a valid selection, and cannot be selected. This helps guide the user by preventing selection of inappropriate menu items. Several items may not be selected until the user has performed other operations.
The upper rightmost menu is used to control the Display Area. In the Viewing submenu, the user may set various Axial views or X,Y,Z views; Rotate, Translate, or Scale the display; Reset view, which resets the display to the default viewpoint; Save view, which saves the current viewpoint to a text file; or Restore view, which restores a previously-saved viewpoint.
Under the Options submenu, the user may choose the Color mode for the GMAN screen, define the type of Coord. System used, and choose the Projection mode.
The region of the grid shown in the Display Area may be set using the Center option, which allows the user to pick the center and outer boundary of the desired region, effectively zooming in or out on the selected region. Reset sets the viewpoint back to the default, which is based on the minimum and maximum coordinates of the first grid displayed.
The Drawing option toggles display redrawing on and off, with the current state displayed next to the menu item itself. This option may be helpful when using slower graphics devices. With Drawing ON, each time the user selects a menu item that affects the display, the Display Area is redrawn. This can be a slow process on slower graphics devices, especially if there is a lot to be drawn. By setting Drawing OFF, making changes to the display, and then setting Drawing ON, the user may save a lot of time in a GMAN session.
The first item in all the Display Options sub-menus is a menu title (e.g., ===VIEWING===). Picking the title will return to the previously-chosen menu.
GMAN's most basic function is the interactive display of a computational mesh. This is accomplished using the SHOW selection in the Display Selection menu, located immediately below the Display Options area on the right side of the screen. Picking SHOW, then SHOW SURFACES from the next sub-menu, allows portions of the mesh to be displayed by selecting various zones and constant-index planes within each zone. In this way, a user may create a representative picture of the mesh used for a particular flowfield problem.
Once the grid is displayed, the user may place the cursor (or crosshairs) over the grid and pick a grid point, causing GMAN to display the zone number, computational indices and x-, y- and z-coordinates of the selected point. NEXT PLANE and PREVIOUS PLANE options allow the user to step through planes of a particular index, which is helpful in visualizing changes in the grid throughout the flowfield.
GMAN is structured such that the user can begin with the top level Main Menu and step down through various functions in the code in a logical manner. The Main Menu lists the major tasks that may be performed by GMAN. Picking the OPEN FILE(S) menu selection produces a sub-menu in the Menu Options area listing the different file types recognized by GMAN. At the beginning of a GMAN session, the code automatically places the user in the OPEN FILE(S) sub-menu, since a file must be opened before the user can proceed.
Note that when reading a Zone Definition File (ZDF), only boundary points will be stored in the Mesh Direct Access (MDA) file that is created. The GRID GENERATION / INTERIOR GRID / ALGEBRAIC option should be used to generate an initial algebraic interior grid.
After a file has been opened, and after displaying the grid using the SHOW selection from the Display Selection menu, the user will normally select GLOBAL OPTIONS, GRID GENERATION, or BOUNDARY COND. from the Main Menu, all of which will produce sub-menus containing more specific options. GLOBAL OPTIONS may be used to scale the grid, set the grid units, or read in a zone from another file. GRID GENERATION may be used to modify an existing zone, to generate or redistribute the grid points in a zone (given the boundary grid), or to adapt the grid to an existing flowfield. BOUNDARY COND. is used to set boundary condition types, and perform zonal coupling.
Selecting SWITCH TO TEXT from the Main Menu will switch the user back to command line mode. Selecting END from the Main Menu will produce a confirmation sub-menu, and a YES-TERMINATE selection from this sub-menu will end the current GMAN session.
When an item from the Main Menu (or one of its sub-menus) is selected that brings up a sub-menu, the initial menu item is added to the Menu Trail, located just above the Main Menu. The Menu Trail thus becomes an ordered history list of selected menus. TOP is the first entry, followed by all the sub-menu selections in the order that they were picked. At any time, the user may jump to a particular menu in the path simply by selecting it from the Menu Trail. In some cases, the user may be prompted as to whether he/she wants to update any active files, particularly when boundary condition and/or grid generation changes have been made.
On SGI workstations, translation, rotation, and zooming of the Display Area can be done using the mouse in the manner of PLOT3D. Moving the mouse while holding the left mouse button down controls rotation. Moving the mouse while holding the center mouse button down controls zooming. Moving the mouse while holding the right mouse button down controls translation.
Note that when the mouse is moving, mouse buttons are associated with translation, rotation, and zooming. Therefore, when picking menu items or screen points, the mouse must be stationary.
Last updated 9 Feb 2000