| Altitude Tracking
TOPIC:
Altitude tracking
OBJECTIVE:
To use geometry to find the altitude of model rockets
DESCRIPTION: In
this activity, students construct simple altitude tracking devices that
are used to measure the angle a rocket reaches above ground, as seen from
a remote tracking site. The angle is drawn on a graph and the altitude
is read from a scale.
EDITED BY:
Roger Storm, NASA Glenn Research Center

Materials and Tools:
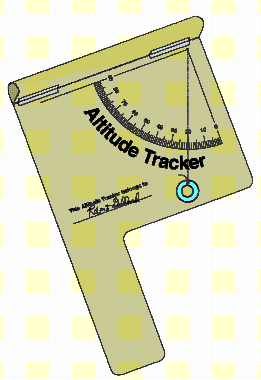
- Altitude Tracker
patterns
- Thread or lightweight
string
- Scrap file folders
or poster board
- Glue
- Cellophane tape
- Small washer
- Scissors
- Meter stick or
steel tape measure (metric)
CLICK HERE TO GET FULL SIZED TEMPLATE
TO PRINT
Procedure: Constructing
the Altitude Tracker
- Copy the Altitude
Tracker pattern on white or colored paper. Cut out the outline and glue
the pattern to a piece of scrap file folder or poster board. Do not
glue the hatched area to the folder or poster board.
- Cut off the excess
file folder or poster board.
- Roll the hatched
area at the top of the pattern into a tube and tape the upper edge along
the dashed line at the lower edge. Shape the paper into a sighting tube.
- Punch a tiny hole
in the apex of the protractor quadrant.
- Cut out the Altitude
Calculator and punch a hole at the apex of its protractor quadrant.
Glue the Altitude Calculator to the back of the tracker so that the
two holes line up.
- Slip a thread
or lightweight string through the holes. Knot the thread or string on
the calculator side.
- Hang a small washer
from the other end of the thread as shown in the diagram of the completed
tracker.
Procedure: Using
the Altitude Tracker
- Select a clear
spot for launching water or bottle rockets.
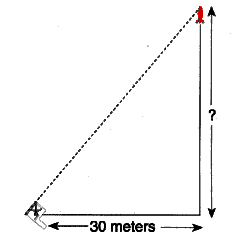
- Measure a tracking
station location exactly 30 meters away from the launch site.
- As a rocket is
launched, the person doing the tracking will follow the flight with
the sighting tube on the tracker. The tracker should be held like a
pistol. Continue to aim the tracker at the highest point the rocket
reached in the sky. Have a second student read the angle the thread
or string makes with the quadrant protractor.
Procedure: Determining
the Altitude
- Use the Altitude
Calculator to determine the height the rocket reached. To do so, pull
the thread or string through the hole in the tracker to the Altitude
Calculator side until the washer stops it. Lay the string across the
protractor quadrant and stretch it so that it crosses the vertical scale.
(See sample calculation.)
- Read the altitude
of the rocket. The altitude is the intersection point of the string
and the vertical scale to that number. Add the height of the person
holding the tracker to determine the altitude the rocket reached.
Discussion:
This activity makes
use of simple trigonometry to determine the altitude a rocket reaches
in flight. The basic assumption of the activity is that the rocket travels
straight up from the launch site. If the rocket flies away at an angle
other than 90 degrees, the accuracy of the procedure is diminished. For
example, if the rocket flies toward a tracking station as it climbs upward,
the altitude calculation will yield an answer higher than the actual altitude
reached. On the other hand, if the rocket flies away from the station,
the altitude measurement will be lower than the actual value. Tracking
accuracy can be increased, however, by using more than one tracking station
to measure the rocket's altitude. Position a second or third station in
different directions from the first station. Average the altitude measurements.
Teaching Notes and
Questions:
- This activity
is simple enough so each student can construct his or her own Altitude
Tracker. Permit each student to try taking measurements while other
students launch the rockets. To assure accuracy in taking measurements,
practice measuring the height of known objects such as a building or
a flagpole. It may also be necessary for a few practice launches to
familiarize each student with using the tracker in actual flight conditions.
- Why should the
height of the person holding the tracker be added to the measurement
of the rocket's altitude?
- Curriculum guides
for model rocketry (available from model rocket supply companies) provide
instructions for more sophisticated rocket tracking measurements. These
activities involve two station tracking with altitude and compass direction
measurement and trigonometric functions.
|