
|
Wind Gauges
Activity
|

|
If so instructed by your teacher, print out a worksheet
page for these problems.
Explanation:
After becoming familiar with the way in which FoilSim demonstrates
the factors that affect lift, you will be expected to make a device
to demonstrate low levels of wind speed. You will be guided through
creating a stand, a balancing arm, and a uniform airfoil. Once these
are completed, experiment using changes in weight to determine a
scale and measuring device for wind speed.
Step 1. The Stand
CLICK HERE FOR A
DIAGRAM
- You should obtain an empty soda pop can and a spring
operated clothes pin.
- If your clothes pin does not have holes in the pinch part,
the area where you put your fingers, you must put a piece of
masking tape doubled over on each edge. There should be
approximately 2 cm. of tape protruding from each end.
- With a pair of scissors, cut out a small notch in each of
these tape pieces. This becomes the holder for your straight
pin.
- Place the clothes pin on the turned up tab opener of your
pop can. Make sure it is perpendicular to the top of the
can.
- Add water to the can to keep it from falling over when air
is blown across the foil.
Step 2. The Balancing
Arm
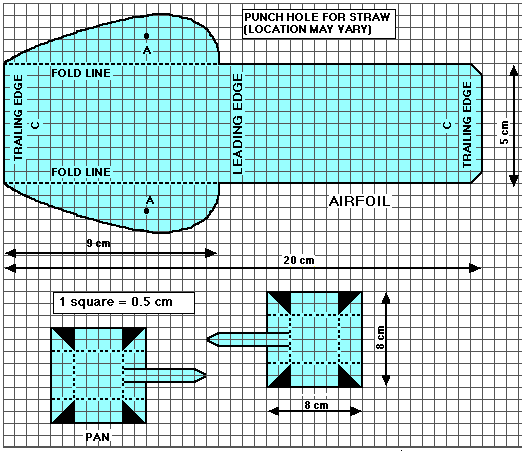
A. The Weight Pan:
- Glue the Weight Pans Pattern to a piece of manila file
folder.
- Cut out each pan. Cut on all solid lines and remove the
dark triangles from each corner.
- Fold along each of the dashed lines.
- Glue a toothpick or short piece of skewer onto the pan
along the axis. Let dry.
- Fold up the sides of the weight pan and glue each
triangular flap. Allow to dry.
B. The Airfoil:
- Do not glue the Airfoil Pattern to a piece of
manila folder. Cut out the paper pattern.
- Using the point of a pencil, make a small hole at dot
A on both sides of the foil. The hole should be slightly
smaller than your straw so that as it slips through, it is
held snugly.
- Fold along the dashed fold lines.
- Gently bend the paper so that Trailing Edge C
aligns with Trailing Edge C. Tape together.
- Mark your straw at 3 cm and 10 cm from the left
end.
- Gently place the straw through your Airfoil at dot A to
the right and left. The left side of your Airfoil should be
on the 3 cm mark.
- Put a drop of glue in each end of the straw and attach
each weigh pan. Make sure the pans are level one to the
other.
- Put a pin through the 10 cm mark perpendicular to and
level with the weight pans. There should be an even amount
of pin on each side of the straw.
- Place the pin in the clothes pin holder. If you have
done everything correctly, the straw should dip toward the
side with your airfoil.
 CLICK HERE TO GET PATTERN TO
PRINT AND CUT
CLICK HERE TO GET PATTERN TO
PRINT AND CUT
Step 3. The
Adjusting
- Into the pan on the high (light) end of the straw, place or
attach paper clips until the Airfoil is just about to "lift
off."
- If one paper clip is not enough and two are too much, you
may use small pieces of tape placed on the pan to balance your
straw mechanism.
Step 4. The
Testing
- With the wing level with your mouth, blow a horizontal
stream at the Leading Edge of the wing section. The wing
section should lift off and cause the pan on the other side to
"bottom out." Try to keep a steady stream of air so that your
wing and pans are level. If you have to blow hard, the wing
section is not balanced properly and you may need to add more
weights.
Step 5. The
Assessment
As designed, the wing device demonstrates that blowing
air across the wing generates enough lift to overcome its small
amount of unbalanced weight. Small masses can now be added to the
weight pan on the Airfoil side. It should be possible to quantify
the amount of lift generated by blowing air across the wing.
- Using a blow drier on low setting, determine the mass that
your Airfoil will lift. You do this by adding weight to the
Airfoil side pan until you have an easy leveling process.
- Add one more mass beyond the level position. This confirms
that you had the maximum weight lift for that airspeed.
- Record the maximum mass in grams that your foil could
lift.
- Increase the drier speed to the middle level and continue
collecting your data as you did before. Record.
- Finally, increase the drier to its top speed and collect
your data. Record.
- Graph these three points.
Data Table:
|
|
Trial 1
(Mass in g)
|
Trial 2
(Mass in g)
|
Trial 3
(Mass in g)
|
|
Low Speed
|
|
|
|
|
Middle Speed
|
|
|
|
|
High Speed
|
|
|
|
Step 6: The
Analysis
- Based on your observations and your data, what do you think
will happen as you increase the mass and not the airspeed?
- Based on your observations and your data, what do you think
will happen as you increase the airspeed and not the mass?
- What do you predict will happen if you blow across the
Trailing Edge of the wing section?
- List other wing shapes that you think might work better and
tell how you would test your predictions.
|