
Selection of the Modular Aerodynamic Design Computational Analysis Process (MADCAP) "File" menu item produces the drop down menu shown below.
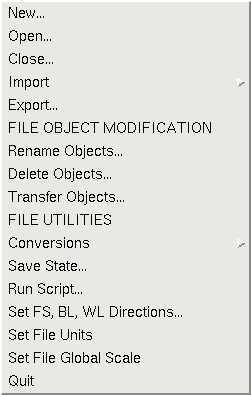
There are fifteen selections under the File menu. They are:
Help on these submenus is available below.
Selection of the "New ..." submenu causes the following window to be displayed (note on Microsoft Windows OS platforms, the file dialog box may have a slightly different appearance).
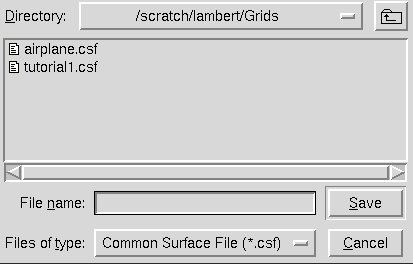
This menu can only be used to open new files. Previously existing files can be opened via the Open ... menu.
The "Directory" dropdown menu at the top of the dialog allows the user to move up in the directory tree, as does the folder button next to it. The new file will be created in the directory that is shown.
The drop-down menu at the bottom of the window is used to select the type of file to be created. The choices are:
| .csf | Common Surface Files | ||
|---|---|---|---|
| .cgd | Common Grid Files |
To open (create) a new file, enter the name of a new file in the "File name:" text entry box and click on the "Save" button with the left mouse button. The file name (including the file extension should be entered in the text box). The window closes and a new file with the selected name is created.
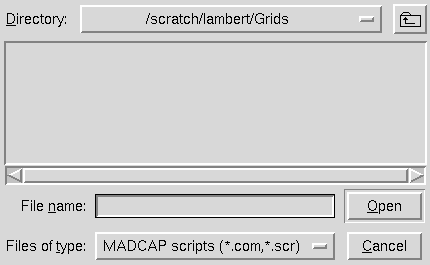
Selection of the "Open ..." submenu causes the following window to be displayed (note on Microsoft Windows OS platforms, the file dialog box may have a slightly different appearance).
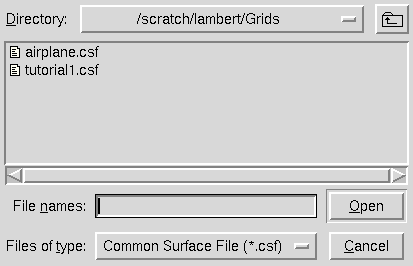
The "Directory" dropdown menu at the top of the dialog allows the user to move up in the directory tree, as does the folder button next to it. The drop-down menu at the bottom of the window is used to select the type of file to be opened. The choices include:
| .csf | Common Surface Files | ||
|---|---|---|---|
| .cgd | Common Grid Files | ||
| .tmp | Surface Geometry (ZONI3G) Temp Files |
Only the ".cgd" and ".csf" options can display surfaces. It is not currently planned that the old .tmp file surfaces will be viewable in MADCAP, since that format is being replaced by the Common File .csf format. The list of surface names in .tmp files can be displayed, however, either alphabetically or chronologically. See Surface File Sort Mode for details. .cgd files are the standard grid data file supported by Wind-US. These files typically are used to store the final volume mesh and contain one or more zone entities. The .cgd file usually contains the final boundary condition information for the flow solver and the coupling information between zones. .csf files (common surface file) is the MADCAP database format. This file contains all of the intermediate steps from a grid session.
The selected file type menu not only controls the type of file to be opened, but also the types of files displayed in the file list. Only file names of the given extension, in the currently set Directory Path, are displayed. To list all files in the given directory, select "All Files(*)" from the file type menu. The directory path is set to the working directory from which MADCAP is being run. To change it, enter the new directory name in the entry box and enter a carriage return. To select the file to be opened, highlight its name in the list of files. If a new file is to be opened, set the directory path where the file is to be located and then type a new name in the entry box near the bottom of the window.
If the file being opened is a .csf or .cgd file, it is automatically set as the working file.
When the correct filename has been either selected or entered, click on the "Open" button at the bottom-right of the screen with the left mouse button. The window will close and the file will open. Multiple files may be selected by holding down the control key while selecting the names. Control will be returned to the MADCAP process, and all specified files will be opened, with the current display file set to the last file specified to be opened. Currently, 10 files may be opened at any one time in the system.
To escape from this window with no action being taken, select the "Cancel" button.
The associated text command is:
file open {tmp | cgd | csf} filename
Selection of the "Close ..." submenu causes the following window to be displayed.
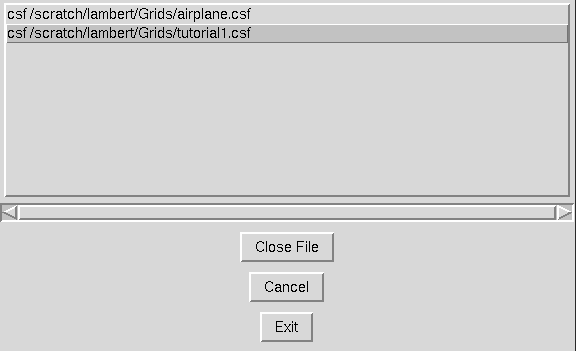
The files currently open in MADCAP, and their associated types, are listed at the top of this window. (Types are displayed to the left of the file name in the list.) To close any file, select a file name with the left mouse button, and then pick the "Close File" button. If no other files are to be closed, choose the "Exit" button. Otherwise, continue selecting file names and picking "Close File" until all files to be closed have been specified. When the "Exit" button has been picked, control will be returned to the MADCAP process, and all specified files will be closed. Any surfaces currently displayed from these files will be turned off. If the current display file is closed, the first remaining name in the list of open files will be set to the Display File.
To escape from this window with no action being taken, select the "Cancel" button.
The associated text command is:
file close {tmp | cgd | csf} filename
Selection of the "Import" submenu causes the following pulldown menu to be displayed.
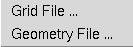
The "Import" menu is used to import data from grid files that are not in one of the MADCAP standard formats. Several file formats are supported.
Selection of the "Grid File" menu option causes the following window to be displayed.
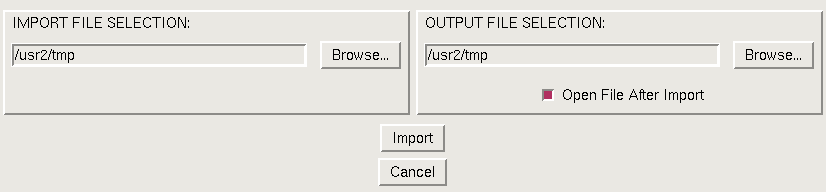
File formats other than the primary MADCAP formats (.csf, .cgd) can be imported into a .csf/.cgd file from this menu. The objects from the file can be imported directly into an open .csf/.cgd file or into a new or existing file. The file to be imported is selected on the left side of the panel, the file to import into is selected on the right side of the panel. The "Open File After Import" radio button can be selected to automatically have MADCAP open the .csf, .cgd file after file import.
Supported unstructured grid formats include AFLR (ugrid, sgrid, fgrid, etc), AFLR surface, fast, nastran, gambit, CGNS, and tecplot. In addition, structured grids from plot3d, temp, tecplot, agm, and hess files may be imported. Edge meshes from Fieldview particle paths can also be imported. The AFLR, AFLR surface, fgrid, fast, nastran, gambit, and CGNS formats use the AFLR file I/O library. The file names for these formats must follow the AFLR file naming convention.
The "Geometry File" menu option is unsupported in the version of MADCAP distributed by the NPARC Alliance.
Selection of the "Export ..." submenu causes the following window to be displayed, and allows a user to transfer objects to other files.
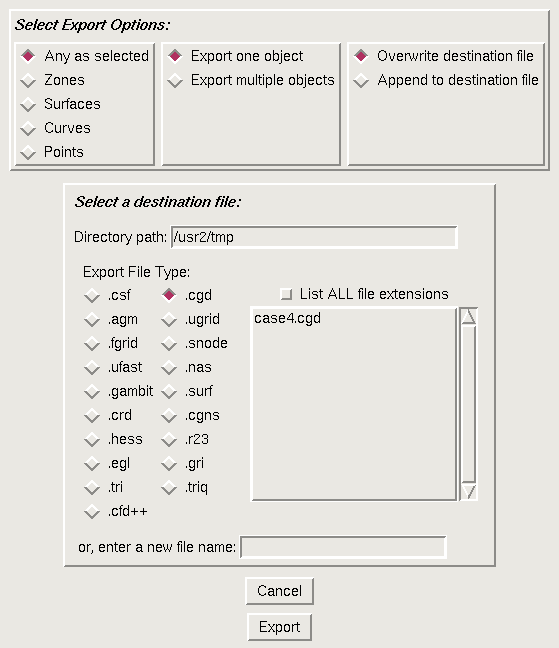
The radio buttons at the top of the dialog control the type of objects to be exported, whether one or more objects are to be exported, and whether to overwrite the destination file.
The lower part of the dialog contains details about the file to which the object or objects are to be exported. The directory path is where the file will be written, and defaults to the working directory. Several file types are available for conversion. Note that some file types do not support all object types. Some file types have additional options which will be displayed when the radio button for that type is displayed.
The fgrid, ufast, gambit, crd, ugrid, snode, nas, surf and CGNS formats use the AFLR file I/O library. The file names for these formats must follow the AFLR file naming convention. For example, ugrid files should contain the extension in the name and the file format will be determined by the extension name. For ugrid files these are .r4.ugrid for a binary single precision file, .r8.ugrid for a double precision binary file, etc. More information on AFLR file formats can be found in the AFLR user guide.
If exporting an object to an existing file, select that file in the file list. If exporting to a new file, enter the file name in the "new file name" text box.
Selection of the "Rename Objects ..." submenu causes the window below to be displayed.
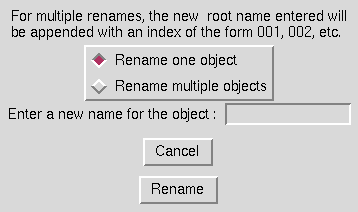
This option is used to rename any object in the current working file. Simply choose whether to rename a single object or a group of objects and enter a new name in the entry box. As indicated in the window, for multiple renames, the new object name consists of the root name entered appended with an index of the form 001, 002, etc. To begin the rename process, select the Rename button. The main graphical window will then prompt the user to select the object or group of objects to be renamed.
To escape this window with no action being taken, select the "Cancel" button.
The text commands generated are:
   om select object_definition
   file rename to newname
or
   om looplist clear
   om looplist object_definition (Multiple instances)
   om loop begin
   om select $list
   file rename to newname
   om loop end
Selection of the "Delete Objects ..." submenu causes the window below to be displayed.
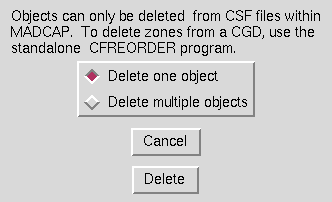
This option is used to delete objects in the current working file. Currently, delete only works for .csf files. To delete zones from .cgd files, the standalone program cfreorder must be used. In the future, this functionality will be included in MADCAP. To delete objects from a .csf file, simply choose whether to delete a single object or a group of objects and click on the Delete button. The main graphical window will then prompt the user to select the object or group of objects to be deleted.
To escape this window with no action being taken, select the "Cancel" button.
The text commands generated are:
   om select object_definition
   file delete
or
   om looplist clear
   om looplist object_definition (Multiple instances)
   om loop begin
   om select $list
   file delete
   om loop end
Selection of the "Transfer Objects ..." submenu causes the window controlling the transfer of object data between .cgd files and .csf files to be displayed. If the user sets the "destination file type" radiobutton to ".csf", the following window is displayed.
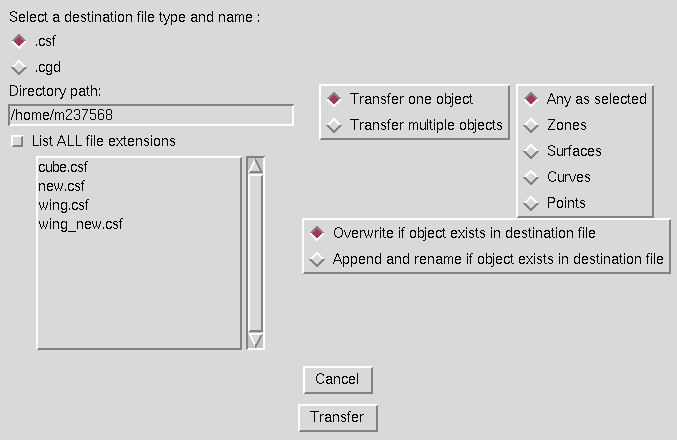
The user selects a .csf file to transfer to from the list of files presented. The directory path for these files may be changed as desired, and all file extensions may be viewed by setting the associated checkbutton. Three additional options should then be set to the right of the window. First, set whether a single object or multiple objects are to be transferred. Next, set the option for the type of objects to be transferred. If the "Any as selected" button is selected, objects of mixed type can be transferred, but the entire entity selected will be transferred. For example, you cannot transfer only a certain curve from a surface - the entire surface would be transferred. If the "Curves" option were set, any curve, existing as an independent object or a member of a surface or zone, could be transferred. Finally, the option for handling cases where an object of the given name already exists in the destination file must be set. This option can be set to "overwrite" or "append and rename".
If the destination file is a .cgd file, the window presented is identical to that for a .csf file, as long as multiple objects are being transferred or the object type is set to "Any". Otherwise, an additional write option is presented for replacing a specific portion of a zone in the destination .cgd file, as shown in the window below for transferring a single surface to replace a specific plane in a specific zone of the destination .cgd file.
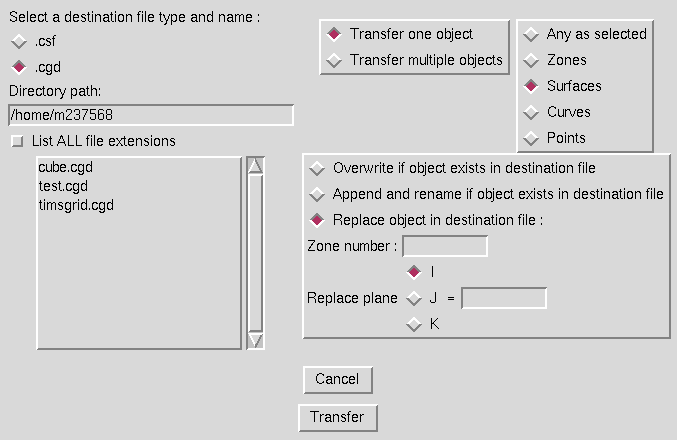
In this example, the user must enter the zone number, plane type, and plane index to be replaced when the selected surface is transferred to the .cgd file. In this manner, selected regions of zones in .cgd files may be modified by transferring smaller pieces of the zone from a different file. If the "Zones" object type is set, only the zone number to be replaced is entered. Similarly, if the option is "Curves" or "Points", the replace region is expanded to include the ability to specify a specific curve or point in the zone. Selecting the "Transfer" button will cause the MADCAP main graphical window to prompt for the objects to be transferred. The user should either select the appropriate objects or abort the operation using the on-screen abort button. When the final object has been selected, the objects will be transferred. To escape this window with no action being taken, select the "Cancel" button.
The text commands generated are:
   om select object_definition
   file transfer to file [csf | cgd] filename \
      [overwrite | replace zone zonenum | insert zone zonenum ijkrange]
or
   om looplist clear
   om looplist object_definition (Multiple instances)
   om loop begin
   om select $list
   file transfer to file [csf | cgd] filename \
      [overwrite | replace zone zonenum | insert zone zonenum ijkrange]
   om loop end
Selection of the "Conversions" submenu causes the following pulldown menu to be displayed.
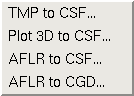
This menu allow entire files to be converted from one format into the MADCAP .csf or .cgd formats. This capability is being replaced by the MADCAP Import menu which can also be used to convert file formats. Currently, conversions from the ZONI3G .tmp and PLOT3D formats to the Common Surface File (.csf) format are supported. Note, this menu is being phased out.
Selection of the "TMP to CSF ..." menu causes the following window to be displayed.
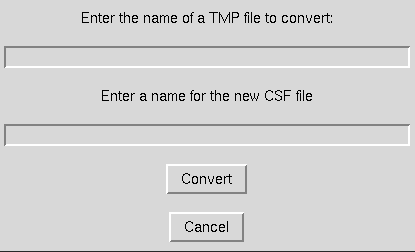
The name of the ZONI3G .tmp file to be converted is entered into the first entry area, and a name for a new Common Surface (.csf) File is entered in the second box. Selecting the "OK" button will cause the conversion process to begin. To escape with no action being taken, select the "Cancel" button.
MADCAP messages are posted to the user as surfaces are transferred from the .tmp file to the .csf file. Currently, only ZONI3G type 106, 5001, and 7001 surfaces are supported in the .csf format. Thus, unstructured surfaces and zones are not transferred. Additionally, the zone node in the .csf format only supports grid planes, and not the zonal geometry or edge and corner surfaces available in the .tmp file. These surfaces are transferred into the STRUCTURED SURFACES node rather than into the ZONE node. The user is notified if any unsupported types are encountered in the conversion process, and if any Common File errors are generated during execution.
The associated text command is:
file convert {tmp} filename {csf} filename
Selection of the "PLOT3D to CSF ..." menu causes the following window to be displayed.
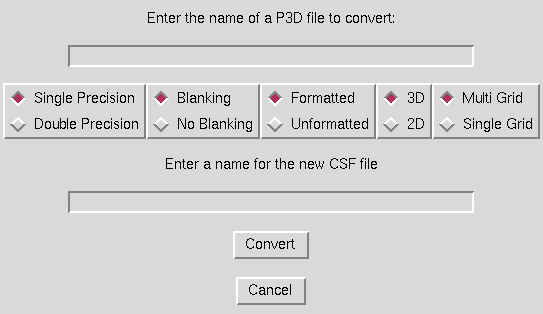
The name of the PLOT3D file to be converted is entered into the entry box at the top of the window. All of the various PLOT3D file options must be set to match the attributes of the PLOT3D file being converted. Finally, a name for the .csf file to be created should be entered in the entry box at the bottom of the window. Selecting the "Convert" button will cause the conversion process to begin. To escape with no action being taken, select the "Cancel" button.
The associated text command (shown here on multiple lines for clarity) is:
   file convert 'p3d filename [doubleprecision | standardprecision] \
      [blank | noblank] [formatted | unformatted] [3d | 2d] \
      [multigrid | singlegrid]' {csf} filename
Note that any options must be included in single quotes with the filename.
Selection of the "AFLR to CSF ..." menu causes the following window to be displayed.

The name of the AFLR file to be converted is entered into the entry box at the top of the window. A name for the .csf file to be created should be entered in the entry box at the bottom of the window. Selecting the "Convert" button will cause the conversion process to begin. To escape with no action being taken, select the "Cancel" button.
Selection of the "AFLR to CGD ..." menu causes the following window to be displayed.
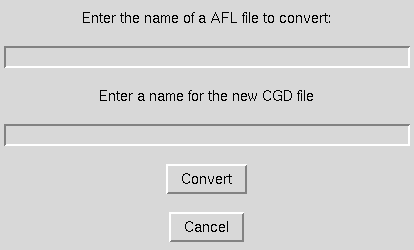
The name of the AFLR file to be converted is entered into the entry box at the top of the window. A name for the .cgd file to be created should be entered in the entry box at the bottom of the window. Selecting the "Convert" button will cause the conversion process to begin. To escape with no action being taken, select the "Cancel" button.
Selection of the "Save State ..." submenu causes the following dialog to appear.
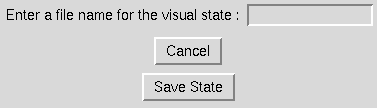
Enter a file name to save the current state in. The current open files will be saved along with currently displayed objects and the current view. This file can be run as a MADCAP script in a future session to restore the current state. To execute the script, type "script filename" in the "Text Command" entry field on the main menu.
Selection of the "Run Script ..." submenu causes the following dialog to appear.
This dialog allows the user to execute a MADCAP script. The script name may be entered in the text box, or may be selected from the displayed file list. The "Directory" menu allows for navigating to another location to find the desired file. After the script is selected, selecting "Open" causes the script to be read and executed.
Selection of the "Set FS,BL,WL Directions ..." submenu causes the following window to be displayed.
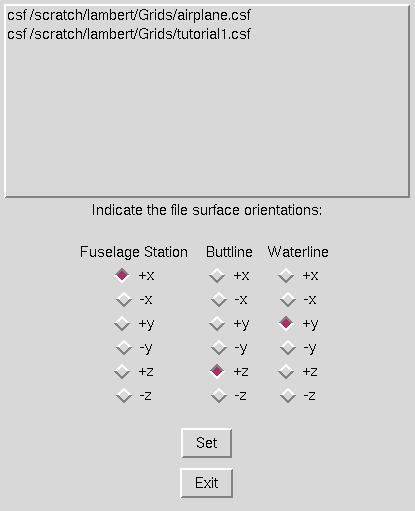
MADCAP users have the option of displaying data in the pure x, y, z coordinate system in which the data has been stored, or in a fuselage station (FS), buttline (BL), waterline (WL) coordinate system. This window is used to relate the physical x, y, and z coordinates in the file with FS, BL, and WL directions. Different files may have different relationships between pure x,y,z coordinates and FS,BL,WL coordinates. In this manner, a file in which the up direction is +y and a second file in which the up direction is +z can be viewed consistently by setting the appropriate FS, BL, WL directions in this window, and then setting the View Axis Mode to FS, BL, WL. This control affects viewing of the data only - the coordinate values in the file are not changed.
The files currently open in MADCAP, and their associated types, are listed at the top of this window. To establish a relationship between x,y,z and FS,BL,WL for a given file, highlight a file in the list by selecting it with the left mouse button, and then use the three columns of radiobuttons to define the positive FS, BL, and WL directions. When the correct settings have been made, pick the "OK" button.
The default settings for a file upon opening are FS = +x, BL = +z, and WL = +y.
Setting the relationships in this window does not change the axis mode to FS, BL, WL, but only establishes relationships. To switch to FS, BL, WL axis mode, use the View Axis Mode menu item.
To leave this menu, choose the "Exit" button.
The associated text command is:
file axisdef {tmp | cgd | csf} filename fsdir bldir wldir
Selection of the "Set File Units" submenu causes the following to be displayed.
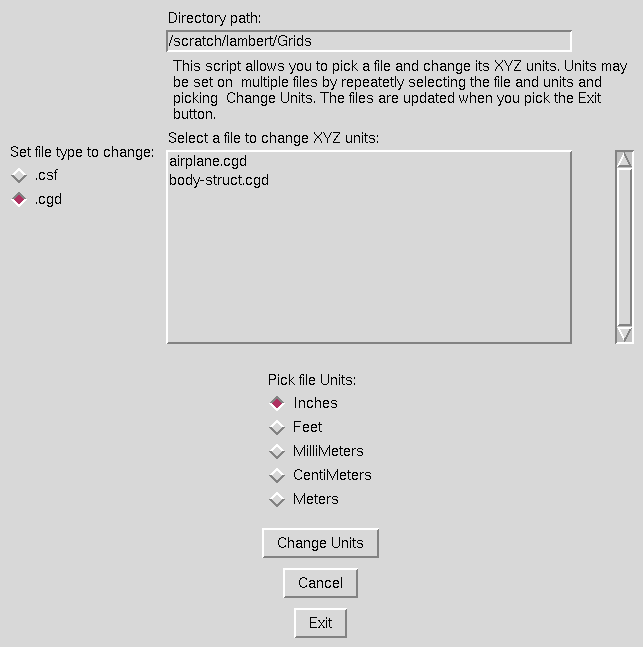
The units of a .csf or .cgd file may be changed with this menu. Select the file to be changed, and select the new units. The "Change Units" button will modify the file. To leave this menu without changing the file, select the "Cancel" button.
Selection of the "Set File Global Scale" submenu causes the following to be displayed.
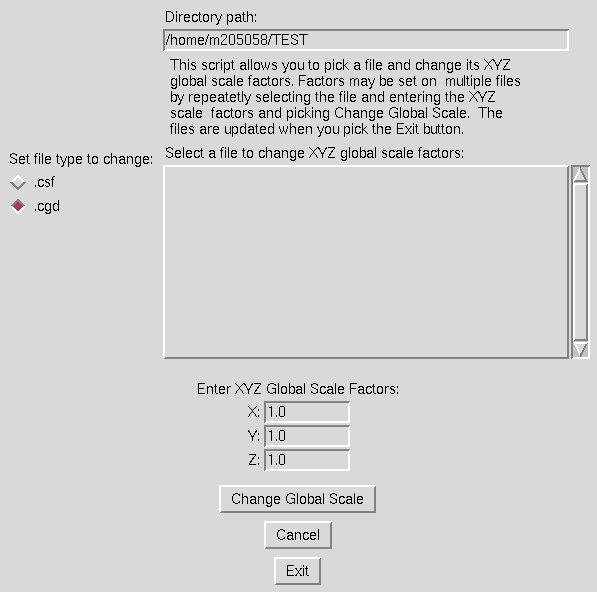
The global scale factor of a .csf or .cgd file may be changed with this menu. Select the file to be changed, and select the x, y, and z scale factors. The "Change Global Scale" button will modify the file. To leave this menu without changing the file, select the "Cancel" button.
Selection of the "Quit" submenu causes the main GUI screen to change to look like this:
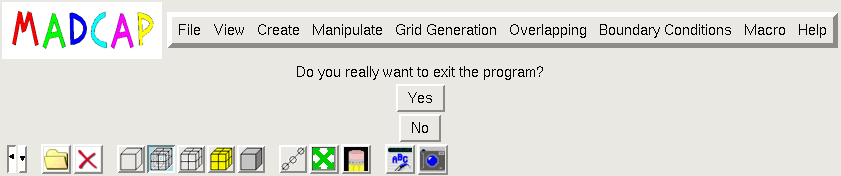
If "Quit" was chosen by mistake, choose the "No" button and no action will be taken - the system remains running at the point at which it was before the "Quit" button was selected. If you do intend to quit the program, you are given the option of saving the current program settings. Selecting the "Yes, and save settings" button will cause a file to be created in your working directory called madcap-your-user-id.config, which contains the settings in effect during this session for many of the MADCAP windows. The next time you run MADCAP from this directory, these settings will be used as default values in the MADCAP GUI. If you do not wish to create this file, select the "Yes, but do NOT save settings" button, and the program will terminate without the file being created. The next time you run MADCAP from this directory, the GUI will use all default values, or a previously generated configuration file.
Last updated 8 Dec 2008