
|
Design of Airfoil and Problem-Solving Using
FoilSim
Answers
|

|
Step 1. Set the velocity to 50 mph and record the lift.
Increase the airspeed slider to 100 mph. Record lift. Increase the
velocity to 150 mph and record lift again. Finally increase the
velocity to 200 mph and record lift. Describe the change that you
observe in lift as velocity changes. Graph lift vs. velocity.
|
50 mph
|
100 mph
|
150 mph
|
200 mph
|
|
Lift
=505
|
Lift =2022
|
Lift =4550
|
Lift =8089
|
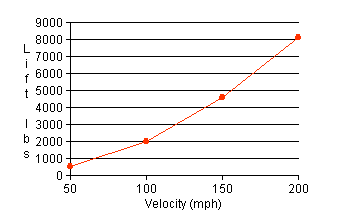
As velocity doubles, lift
quadruples.
Step 2.
Return to the Reference condition and select the "Stall Model".
Set the angle at 2.5 and record lift.
Repeat, setting the angle for 5.0, 7.5, and 10 and record lift for
each setting. Graph the results.
Complete your graph with a
stall at an angle of 12. Will lift be generated at an angle of 0?
No Explain.
Symmetric airfoil (camber = 0) has symmetric flow field and
generates no lift at angle = 0.
Answers will
vary.
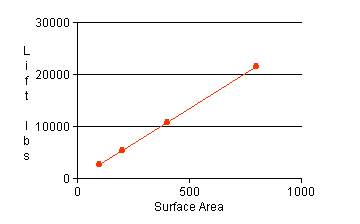
Step 3.
Return to the Reference conditions.
Set the
surface area to 100 sq.ft. Record the value for lift. Double the
surface area. How is lift affected? Record lift. Double surface area
two additional times and record lift. Graph lift vs. surface area
from the data recorded. Explain how an airplane can slow its velocity
for landing and still maintain sufficient lift to avoid a stall.
|
Surface Area=100
|
Surface
area=200
|
Surface
area=400
|
Surface
area=800
|
|
Lift =2696
|
Lift =5393
|
Lift
=10786
|
Lift
=21572
|
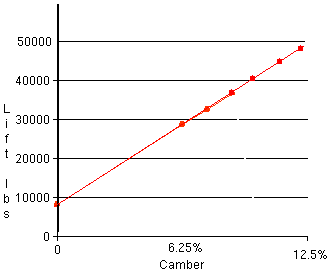
Step 4.
Return to the Reference conditions.
Set the camber at 0. Record lift. Increase
camber to 6.25, 7.5, 8.75, 10.0, 11.25, and 12.5 and record the changes in
lift for each setting. Graph lift vs. camber with the data recorded.
Is it possible for camber adjustment to initiate a stall?
Explain.
|
0
|
6.25
|
7.5
|
8.75
|
10.0
|
11.25
|
12.50
|
|
Lift =8089
|
Lift
=28537
|
Lift
=32626
|
Lift=36714
|
Lift =40806
|
Lift =44889
|
Lift =48975
|
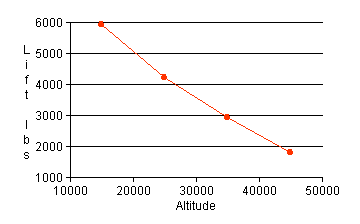
Step 5.
Return to the Reference conditions.
Adjust the
altitude slider to 15000 ft., 25000 ft., 35000 ft., and 45000 ft. and
record lift at each setting. Graph lift vs. altitude with the data
collected above and predict the next two points on the graph. Is lift
affected by an increase in altitude? List possible reasons for any
changes observed.
|
15000 feet
|
25000 feet
|
35000 ft
|
45000 ft
|
|
Lift =5910
|
Lift =4212
|
Lift =2914
|
Lift =1810
|
Step 6. An airplane is beginning its descent at an
altitude of 1500 ft. and a beginning velocity of 200 mph. Gradually
decrease altitude and velocity and note the change that occurs in
lift. Record your observations. Explain how the lift force can be
maintained while velocity and altitude are being decreased as the
airplane approaches landing. Check your explanation using the FoilSim
demonstrator. Summarize your results.
Discussion must include angle of
attack and camber.
Step 7. An airplane travels 40,000 feet
horizontally from the point where it began its descent at an altitude
of 1500 feet. Draw a diagram of the descent showing the vertical and
horizontal components, and calculate the angle of descent for the
airplane.
Angle of descent =
2o
FOILSIM APPLICATION ACTIVITY
Design and build a paper airplane that has the longest time aloft
and travels the greatest distance.
Step 1.
Use unlined paper for your construction. Determine the wing area by
breaking areas of the wings down into triangles and rectangles.
Measure and calculate.
Answers will
vary.
Step 2.
Using the same launch angle and velocity, fly your airplane through
five trials. Measure the wing surface area, distance traveled, and
angle of inclination for the wings in each trial. Make a data table
and record your results. Repeat the trial flights for time aloft.
Again, record the wing surface area, time aloft, and angle of
inclination for the wings in each trial. Graph the area/time or
area/distance data for each set of trials. The trial flights must be
completed indoors to eliminate wind effects.
Answers will
vary.
Step 3.
Write a summary of your results.
Answers will
vary.
Step 4.
Cut one inch off the trailing edge of the wings. Place the cut off
pieces within the folds of the airplane so the mass remains
constant.
Step 5.
Repeat the trial flights, data collection, graphing, and written
summary as above.
Answers will
vary.
EXTENSION ACTIVITY
Design and construct airplanes with other wing shapes. Repeat the
steps of the preceding activity for each design. Provide a written
discussion comparing all results.
Answers will
vary.
|