| Pencil
Rockets
SUBJECT:
Space Flight
TOPIC:
Rockets
DESCRIPTION:
Rockets, using pencils for their bodies, are launched with
a rubber band-powered launch platform.
CONTRIBUTED
BY: Gregory Vogt, OSU
EDITED BY: Roger Storm, NASA Glenn Research
 MATERIALS
and TOOLS: MATERIALS
and TOOLS:
- 2 Pieces
of wood 3'X4"Xl" in size
- 2 Cup hooks
- 1 Wooden
spring clothes pin
- 1 Small wood
screw
- 1 Screw eye
- 2 Metal angle
irons and screws
- 4 Feet of
heavy string
- Iron bailing
wire (18 gauge minimum)
- Several rubber
bands
- Several wooden
pencils (unsharpened)
- Several pencil
cap erasers
- Cellophane
or masking tap
- Heavy paper
- Saw
- Wood file
- Drill (3/16
inch diameter)
- Pliers
PROCEDURE
Launch Platform
- Join the
two pieces of wood as shown in the diagram to form the launch
platform. Use a metal angle iron on each side to strengthen the
structure.
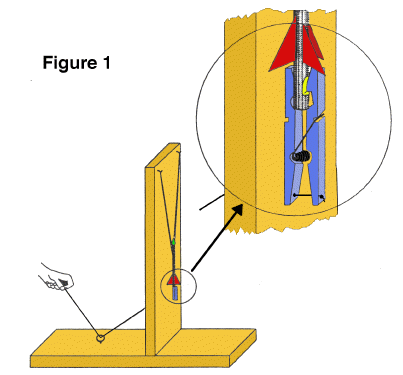
- Screw in
the cup hooks and screw eye into the wood in the places indicated
in figure 1.
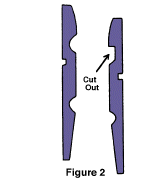
- Temporarily
separate the wooden pieces of the clothes pin and file the "jaw"
of one piece square as shown in figure 2. Drill two holes through
the other wood piece as shown. Drill one hole through the first
wood piece as shown.
- Drill a hole
through the upright piece of the launch platform as shown and
screw the clothes pin to it so that the lower hole in the pin
lines up with the hole in the upright. Reassemble the clothes
pin.
- Tie a knot
in one end of the string and feed it through the clothes pin as
shown in figure 1, through the upright piece of the platform and
then through the screw eye. When the free end of the string is
pulled, the clothes pin will pen. The clothes pin has become a
rocket hold-down and release device.
- Loop four
rubber bands together and loop their ends on the cup hooks. The
launch platform is now complete.
Rocket
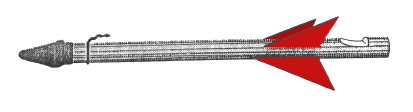
- Take a short
piece of bailing wire and wrap it around the eraser end of the
pencil about one inch from the end. Use pliers to twist the wire
tightly so that it "bites" into the wood a bit. Next, bend the
twisted ends into a hook as shown in figure 3.
- Take a sharp
knife and cut a notch in the other end of the pencil as shown
in figure 3.
Figure 3
- Cut out small
paper rocket fins and tape them to the pencil just above the notch.
- Place an
eraser cap over the upper end of the rocket. This blunts the nose
to make the rocket safer if it hits something.
The rocket is
now complete.
LAUNCHING PENCIL
ROCKETS:
- Choose a
wide open outdoor area to launch the rockets.
- Spread open
the jaw of the clothes pin and place the notched end of the rocket
in the jaws. Close the jaws and gently pull the pencil upward
to insure the rocket is secure. If the rocket doesn't fit, change
the shape of the notch slightly.
- Pull the
rubber bands down and loop them over the wire hook. Be sure not
to look down over the rocket as you do this in case the rocket
is prematurely released.
- Stand at
the other end of the launcher and step on the wood to provide
additional support.
- Make sure
no one except yourself is standing next to the launch pad. Count
down from 10 and pull the string. Step out of the way from the
rocket as, it flies about 75 feet up in the air, gracefully turns
upside down and returns to Earth.
- The rocket's
terminal altitude can be adjusted by increasing or decreasing
the tension on the rubber bands.
DISCUSSION:
Like the flight of Robert Goddard's first liquid fuel rocket
in 1926, the pencil rocket gets its upward thrust from its nose
end rather than its tail. Regardless, the rocket's fins still provide
stability, guiding the rocket upward for a smooth flight. If a steady
wind is blowing during flight, the fins will steer the rocket towards
the wind in a process called 'weather cocking.' On NASA rockets,
active controls steer during flight to prevent weather cocking and
to aim them on the right trajectory. Active controls include tilting
nozzles and various forms of fins and vanes.
Return to Rocket Activities
Return to Aerospace Activities Page
Weather Cocking
Rocket Stability
Aerospace
Education Services Project
Oklahoma State University
|